Search This Blog

Categories

Tuesday, March 19, 2013

I'm buying a house!

I have lived in my current apartment for 3 years now. It's not in the worst neighborhood by any means. However, no matter where you live, if you're renting an apartment, you WILL have some trashy people living near you. People are so rude sometimes. The family that currently lives across the hall from me has a couple kids. That's fine. Except I have no idea how many children they actually have because it seems like there are at least 5 children going in and out of this apartment like 20 times a day. Keep in mind that this is a 2 bedroom apartment so there's no way all these people actually live there. Anyway, we live on the second floor and the stairs go along the other side of the wall as my apartment so when the boys RUN and STOMP as loud as humanly possible up and down the stairs every single day, I get headaches. They seriously have to try to be that loud. The people that live below us frequently play some racing video game and of course they have to play it INCREDIBLY loud. Again, headache.

Needless to say, I am so ready to be living in a real house! This also means that I'll be posting as many things as possible about redoing our house! I already have so many ideas. Let me share some of my awesome ideas with you! The following pictures are ones that were posted on the internet while we were looking for houses.


This is going to be the guest bedroom. It's pretty small, but we'll make it work. My idea with this room is to decorate it with all of our souvenirs from the many travels we've been on.

This will be my son's room. Clearly we're going to paint it a different color. Purple doesn't exactly scream BOY! (which is totally weird because apparently two boys slept in this room.)

It has pretty good curb appeal, huh? We did have a small issue with the roof that was discovered during the inspection, but they fixed it so now it's all good! Always take your inspection seriously!

This is the basement. It is a seriously huge room. I don't know what we're going to do with this space yet, but my husband has some ideas. He wants to add a bar. We'll definitely put our dartboard here, but other than that, it'll probably have some comfortable seating and a big TV.

My husband wants to finish off this area in the basement. Right now it's just stacked cement block walls and a cement slab floor. It could potentially be my office and photography studio. Then, when we sell, it can be considered a bedroom.

Right now, this half bath in the basement is super plain. I want to add some kind of cool painting technique and add some shelves for storage.

This is the living room upstairs. It's not huge, but if it's more than just our little family, we'll go to the basement so I want to make this area very comfortable. I just imagine us spending nights watching some TV or something.

The deck area is very nice. It's right off of the kitchen/dine-in area and it looks over the entire back/side yard. It even has a gate already so that our son can't go down the stairs. He actually just had his 3rd birthday party this past weekend. My parents bought him a picnic table. I hope it fits nicely on our deck.

This is the play equipment that they're leaving behind. My son is super excited to play on it!

This is the eat-in kitchen area. My husband and I were thinking about putting a built-in bench underneath the window on the left. This can also double as a storage area. The bench can flip up and we can keep things for the deck and games in there. Then we'll have a table and chairs to go with it.

There isn't a whole lot that we NEED to do to the kitchen, but there are a few things that we WANT to do. My husband wants to replace all the appliances. If we do, we'll probably get black ones. The kitchen is a little white for my taste. Also, we need to replace the hardware on the cabinets. I'll have to post a close-up picture of them later. They look like vines with leaves at the end. That's just not my taste.

I actually kind of like the bathroom for now. Our current shower curtain is brown with green circles on it so the color scheme is working for me. I'm sure that I'll eventually change everything.

and this will be my bedroom. Clearly we won't have our bed like that. That's just weird. Also, we need to paint. Seriously. This bedroom has the most boring color on the wall. It could definitely use a change.

Hopefully, I can show you all the amazing changes that we'll do to this house! I can't wait until it really feels like home. We close on April 12th. That is a mere 24 days away!

Our Wedding Cake

I absolutely LOVED our wedding cake! I of course had to be involved in everything. I knew that I didn't want to have a circle or square cake. They're beautiful, but they're just so traditional so I asked for something different. The woman at Janet's Cakes in Bloomington, IL told me that they could do a hexagon. I was all for that! Then, we just had vanilla and chocolate as our cake flavors. I can honestly say that I've never had any other flavor of cake that I enjoyed. I don't like red velvet, coconut, strawberry (my least favorite), etc. The whole reason we chose Janet's cakes was because of their amazing frosting! It's the best I've ever tasted! The design on our cake was in one of the books that we were looking at, but I had the idea to do the different colors. Since our wedding colors were that beautiful aqua color and then silver, black, and white, this cake worked perfectly with our special day!


Pictures taken by Kelly Lyle Photography.

Monday, March 11, 2013

Get your bride the name hanger!

Have you seen the personalized hangers? You know what I'm talking about. The ones that are wooden and then your name or something is spelled out in the wire part! They are so interesting. You can find them EVERYWHERE on etsy. Shop around! I suggest looking at several peoples' work. Find the one that you think looks the cleanest and easiest to read before you buy. My sisters got me one for my wedding. I got my maid of honor one when it was her turn to get married. I also saw that one of my other friends had one when she got married. I could barely tell what it said, but when I did figure it out, it read 'Bride'. Those are fine, but I prefer the ones with the name. It seems so personal! The one I got for my maid of honor was even colored! Her wedding colors were black and pink so I got it made with a black hanger and pink wire. Here are some pictures of the hanger my sisters got for me: (It says Mrs. Lukow-my married name)


Pictures were taken by Kelly Lyle Photography.

This is the hanger I got my maid of honor (it says Mrs. Tipton):


The next time you're stumped on what to get the bride in your life and you want to get them something other than what's on their registry (which I suggest sticking to for the most part), get them this hanger!

Tuesday, March 5, 2013

My Wedding: Centerpieces

I've been married to my wonderful husband for 1 year 4 months today! I'm not really sure why I didn't think about posting things from my wedding before now, but I guess better late than never, right?

I personally think that flowers are beautiful, but we had a budget that we were working with that just didn't allow for huge flower centerpieces. What we ended up going with was basically a tall square vase. In the bottom, it had a waterproof LED light, clear beads, turquoise water, and a floating candle in the top.


These are the pictures that our photographer, Kelly Lyle, took. The candles weren't in them yet, but you get the idea.

This is a very easy concept to implement:
1. Buy the vase. We got ours from Michael's Craft Store. If you're on a super tight budget, they frequently have 40-50% off coupons. We bought one at a time over about a year and ended up getting them for a great price.
2. Put the waterproof LED light in the bottom. It's pretty easy to find some cheap ones online. You just have to do a bit of searching.
3. Add the clear beads. You just need to be very careful when doing this. You don't want to flip the LED light or worse, break it. The easiest way to do this is to put the vase at a slant and slide the beads in at an angle.
4. Put in some colored water. The easiest way to do this for me was to fill up an old milk jug with water. I worked out the perfect color and then for every milk jug worth of water, we used the same amount of food coloring for each one. To achieve the same color that I got, we put in 2 drops of blue and 1 drop of green. Then we just poured the water in over the beads. The leave room for the candle, we left a couple inches at the top. You could also put in some flowers (real or fake) for a completely different look.
5. Add the candle and light it right before everyone is set to arrive and you're done! They look great when it's a little dark in the room (which most reception rooms are).

I wish I had some pictures for you when the candle was lit, but I don't. Share what you did for centerpieces or what you would do differently! and I hope you have an amazing wedding day!

Sunday, September 23, 2012

Pocket for a card in a wrapped gift

My sister did this for my birthday last year and I decided to give it a try. Now there's no more losing the card. No more taping the card to the paper.
First, cut your paper to fit the size of present you are wrapping, leaving about 6 extra inches for your pocket. Then, fold the paper in about the half, then back up, making about a 2 inch pocket. After that, fold you're present like usual. And lastly, put the card in the pocket! Easy. Simple. Useful.

Thursday, August 9, 2012

French Tips with a Flare

I went to visit one of my friends recently for a vacation. I rarely get to do my nails in real life because it's a time consuming project that I frankly just don't have time for. Since I was going to be on a week long vacation with no child, I decided to change things up a bit and make my nails pretty for once.

First, I decided to do French Tips with a Flare.
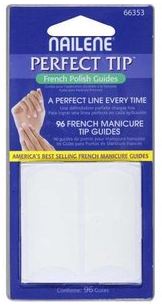
You'll need some supplies to achieve the look that I was going for. You'll need the basics like white nail polish and a good top coat. Beyond that, I bought this from Wal-Mart:
Then, I also bought some art tools like these from Wal-Mart:

First, I put the strips where I want them, paint the tips white, and then remove the strips when they're dry. (I've made the mistake of being too impatient and pulling the strips off before they were dry enough and it turned out TERRIBLE!)
Then, use the nail art tools. Paint a strip of silver right beneath the white that you just painted.
Next, use one of the stencils that comes with the nail art tools to add a little something.
Last, put a couple of layers of top coat to finish everything off and you'll end up with this.

Going to the Zoo

When you go to the zoo, don't forget to take pictures. I prefer to bring my zoom lense. It seems like the animals are always pretty far away from where everyone actually stands. We went at pretty much the worst time to go to the zoo. It was July. It was super hot. A lot of the larger animals were sleeping, but I say that you can make the most of anything. For me, there was no other time to go since I brought my 2-year-old son with me and we had a one hour drive before we got there. I think next time we go, we'll go during the Spring or Fall so that it's not quite as hot. We went to Brookfield Zoo near Chicago, IL. It's a great zoo! The only thing it was missing was an elephant or two. Just remember, have fun!


While I don't have any in this post, don't forget to take pictures with people in them when you go to the zoo. It might be tempting to just get the animals, but the reactions on people's faces can be priceless.

Sunday, July 15, 2012

Grilled Mac 'N' Cheese Sandwich

So, my husband and I came up with this idea to combine two of the greatest cheese dishes together: grilled cheese and mac 'n' cheese! (I'm sure someone's done this before, but I'm not sure who and I don't remember seeing it.) It was absolutely delicious! Our son really loved it too.


First, we made a box of ordinary mac 'n' cheese. Follow the directions on the box.

Then, butter two pieces of bread. Unwrap two cheese slices so that they're ready. (After all, we want this to be super cheesy. It also helps keep the sandwich from falling apart.)

You can do this on the stove top, but we already had our griddle out and that way you can do more than one at a time. Make sure your pan/griddle is heated up before starting. We had our griddle set to 400 degrees which is the highest it will go. Put down 1 piece of bread, 1 slice of cheese, enough mac 'n' cheese to cover the sandwich, 1 more slice of cheese, and then the final piece of bread.

I usually leave my grilled cheese alone until it stops making the sizzling/hissing noise and then check it periodically until it's brown enough for me. Then flip it over and do the same to the other side. Now your sandwich is done!!

Tuesday, May 22, 2012

Making a cardboard box into a toy box for your child

My son has a TON of cars. He just loves all kinds of matchbox cars and monster cars...everything! When we travel, it's difficult to keep them all straight so my dad gave me this box he got from work. It used to contain chocolate bars and he thought it would be perfect for my son's cars. It works great! but I really wanted to make it look a little better. Here's how I did it! 1. Get all your supplies together: -box -paint -paintbrush -mod podge -sticker letters (if you can find them. I got mine at Dollar Tree.)
2. Paint the box
3. Put stickers on the box
4. Mod Podge over the stickers so they never come off. I know my son and he's very destructive! This last step isn't necessary, but for my kid, I sure felt it was.
And now you have a cute little box for your son's toys!

Sunday, May 6, 2012

21st Birthday Cake

So if you follow my blog, you will remember that my best friend just turned 21 a couple of weeks ago. Well, I made her a cake a couple days later when we had a little party for her at home with the girls. It was funny. It was cute. It was slightly inappropriate! We call her wasted Barbie.
She threw up a little. Her hair is a mess. She's missing a shoe. She fell asleep with a cigarette in her hand, holding a bottle of booze. (FYI, we got the mini bottles of alcohol from the liquor store. They're only a couple of bucks so they're perfect. Plus she was able to drink them!)

This was just a plain cake made from a box, covered in icing, and decorated. I hope you have as much making a cake like this as we did. It was hilarious!