...just add a shelf. There are always options. We have a small living room upstairs and a small bedroom. We didn't think there was enough room for another side table in either one of these rooms and then I came up with a brilliant idea! We had some leftover wood from a different project so we just had to buy some L-brackets at the store. I painted two boards and then we rounded off the corners to make it a little safer. After all, we all know that 3-year-old boys are really good at hurting themselves.
Then, I painted the shelves. I found some studs and screwed the shelves into place. It was seriously as easy as that! The take up hardly any room, they're very functional, and they don't look half bad.
Sunday, March 23, 2014


Saturday, March 22, 2014
Tips: Photographing My 1st Baptism

When my sister asked me to photograph my nephew's baptism, I was a bit skeptical. I mean, come on. Everywhere online that I read about photographing one said that it was similar to a wedding. You can't miss the key moments. It goes by fairly quickly. All I could think about was how I'd never photographed a wedding before. So does that mean I would completely screw up this baptism? Oh crap. Well, first of all, my sister knows I never screw anything up completely. I always get good shots. They aren't ALL good. Seriously. Who shoots something and 100% of the pictures are print worthy? And if you know someone who says they do, they're lying. Simple as that. So this is what I learned:
1. Stop stressing.
Seriously. If you freak out, you're not going to get good pictures. Just practice your butt off, research what you can, and photograph to the best of your abilities.

2. Get to the church early.
You will want to walk around the church before everything gets started to find your best angles. By getting there early, I was able to find the stairs to the choir seating up in the balcony and find the best angle (which really came in handy). I was also able to ask the pastor if there were any rules he had for me. Luckily, he was pretty easy going and told me to just stand wherever I wanted.
3. Trust your instincts.
At one point during the ceremony, while the pastor was talking (so no good pictures to be had...or was there?) I thought to go behind my sister (who was sitting in the front row holding my nephew) and I got a couple good shots of my nephew laughing. Then, I went around to the front and got a picture just when the pastor told everyone to look at my nephew. It almost looks like everyone's looking at me. I wouldn't have gotten these shots if I hadn't listened to instincts telling me to try and get some shots during the times with no action.


4. Get the big moments.
I know I said not to stress about it, but there is one really big moment that you need to make sure you get. Just like the big kiss at a wedding, you need to get the baby actually being baptised! If the baptism you photograph is anything like the one that I did, the pastor will pour water over the baby's head for a longer period of time than some little kiss. (or in my case, he poured multiple time) So while it is probably easier than capturing 'The Kiss', it is still incredibly important so be sure to always be ready.


5. Move quickly.
Sometimes, something unexpected is going to happen and you'll need to move quickly. I had no idea that at the end of the ceremony, the pastor was going to ask everyone to stand up and gather around the parents and child to surround them with love and support. Well, I took off in the direction of the stairs that I had found when I got there early that lead to the balcony. I got there just in time to shoot a couple photos of everyone gathered around the happy family.


Hopefully, some of these tips helped you out. And if not, feel free to comment and ask some questions! I love hearing from my readers and I love helping people out. I wish there had been someone to ask questions to before I did this. I feel like so frequently, people try to discourage you from doing things you've never done before. What? You've never photographed a baptism before? Then, you definitely shouldn't do it! How are you supposed to get experience if you don't try it? So go do it, readers! Try something new! Photograph something you've never photographed before!
Thursday, March 20, 2014
DIY: Felt Flowers
Honestly, I started making these to go on a wreath for Spring. And they might still end up there. But I was going to use the pool noodle as my base that I ended up using for an Octonauts Porthole for my son's birthday party. Well, that birthday party is in 2 days! So these flowers are just sitting in my craft bin in my basement waiting for the day that I can take that porthole apart and make my Spring wreath (and I promise to make a post for that too!). But these felt flowers could be used for anything! They could be used on a wreath, a headband, a costume, a belt, etc. Plus, you can make them in any color. So since these little flowers are just so darn versatile, let's learn how to make them!
I started by drawing a circle (which I did by tracing a CD) on a piece of felt.
Then, just start cutting in a swirl pattern from the outside of the circle until you reach the center.
Next, start at the center and wrap the swirl of felt around itself until you reach the end.
Finally, secure everything at the bottom by sewing everything together.
Now you can attach these flowers to anything. Just use some hot glue or you could easily sew them, depending on what you're using them for.
I started by drawing a circle (which I did by tracing a CD) on a piece of felt.
Then, just start cutting in a swirl pattern from the outside of the circle until you reach the center.
Next, start at the center and wrap the swirl of felt around itself until you reach the end.
Finally, secure everything at the bottom by sewing everything together.
Now you can attach these flowers to anything. Just use some hot glue or you could easily sew them, depending on what you're using them for.
Sunday, March 16, 2014
Recipe: Applesauce Pancakes
A couple months ago, my husband was having pains in his side so he went to the doctor where they told him that he probably just pulled a muscle in his side. But just in case it was something more serious, he should try out the BRAT diet (bananas, rice, applesauce, toast) and to come back if the pain didn't go away. (The pain did go away after a couple days.) I was trying to find something that would work for everyone in our family for dinner so I came up with the idea to do breakfast! We came up with this recipe for applesauce pancakes topped with bananas. We actually really liked the taste of these pancakes and they're a little healthier than your average pancakes so we've been using this recipe ever since! I hope you enjoy it as much as we do!

Ingredients:
1 cup flour
¼ teaspoon salt
1 ½ teaspoons baking powder
1 Tablespoon melted butter
½ cup milk
1 egg, beaten
½ teaspoon vanilla
1 ¼ cups applesauce
Steps:
1. Sift flour, salt and baking powder into a medium mixing bowl.
2. Combine butter, milk and egg.
3. Stir into dry ingredients.
4. Add vanilla (unless using flavored applesauce) and applesauce; beat well.


5. Spoon batter into a hot, well greased griddle. When the batter starts to bubble, flip the pancake. Cook until golden brown on the bottom and then serve!


After the pancakes were done, we cut up a couple bananas, put them on top, and then poured a little syrup on top. Done!

Ingredients:
1 cup flour
¼ teaspoon salt
1 ½ teaspoons baking powder
1 Tablespoon melted butter
½ cup milk
1 egg, beaten
½ teaspoon vanilla
1 ¼ cups applesauce
Steps:
1. Sift flour, salt and baking powder into a medium mixing bowl.
2. Combine butter, milk and egg.
3. Stir into dry ingredients.
4. Add vanilla (unless using flavored applesauce) and applesauce; beat well.


5. Spoon batter into a hot, well greased griddle. When the batter starts to bubble, flip the pancake. Cook until golden brown on the bottom and then serve!


After the pancakes were done, we cut up a couple bananas, put them on top, and then poured a little syrup on top. Done!
Saturday, March 15, 2014
Octonauts Birthday Decor: Porthole Door Wreath
We're getting closer and closer to Owen's birthday party! Only 1 more week! I've shown you the invites. Now for the first DIY project I did for this party (and I did a lot). I wanted to make something for the front door so that people would be taken on an Octonauts adventure from the moment they walked through the door. So I made a Porthole, of course!
What You'll Need:
duct tape
pool noodle (I got mine from Dollar Tree last summer)
orange ribbon (and lots of it)
pin/small nail/tape
1 piece of scrapbook paper that looks like water
Steps:
1. Bend your pool noodle into a circle and secure it with duct tape. I found that this was much easier to do with two people. My husband held the pool noodle in place while I duct taped it together. This will be your 'wreath' base.


2. Secure the end of your ribbon to the pool noodle using your pin/small nail/tape. Honestly, I used a small nail because it was the only thing lying around the house that I had. And it worked. Now begin wrapping the ribbon around the pool noodle until the entire thing is covered. I ended up using about 2 ½ rolls of the orange ribbon I got from Wal-Mart.
3. Tape your scrapbook paper to the back of your 'wreath'. I found a piece of scrapbook paper that looked like reflections of light under the water at Michael's.

That's it. I think it turned out pretty good. Hopefully everyone that comes to the party can tell what I was trying to do here. lol
What You'll Need:
duct tape
pool noodle (I got mine from Dollar Tree last summer)
orange ribbon (and lots of it)
pin/small nail/tape
1 piece of scrapbook paper that looks like water
Steps:
1. Bend your pool noodle into a circle and secure it with duct tape. I found that this was much easier to do with two people. My husband held the pool noodle in place while I duct taped it together. This will be your 'wreath' base.


2. Secure the end of your ribbon to the pool noodle using your pin/small nail/tape. Honestly, I used a small nail because it was the only thing lying around the house that I had. And it worked. Now begin wrapping the ribbon around the pool noodle until the entire thing is covered. I ended up using about 2 ½ rolls of the orange ribbon I got from Wal-Mart.
3. Tape your scrapbook paper to the back of your 'wreath'. I found a piece of scrapbook paper that looked like reflections of light under the water at Michael's.

That's it. I think it turned out pretty good. Hopefully everyone that comes to the party can tell what I was trying to do here. lol
Thursday, March 13, 2014
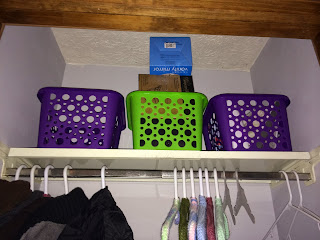
Our Regifting Bin
Some people may find this in bad taste, but others might find it ingenious. We didn't start this on purpose. It started out as a place to stash things that we didn't know what to do with. Then, it became the place we put gifts that we couldn't return. Now, it's our re-gifting bin. The trick is to remember who gave it to you and to not give it back to them!
In our bin we have a glass mixing bowl from Pampered Chef. It's in there because I registered for one for our wedding and we received 3. As it turns out, I really enjoy having 2. I use them all the time. However, I really don't need 3. After I got them, I researched returning them and found that it was incredibly difficult. Bad Pampered Chef! That is not a good thing to be known for! Oh well. It's a really good gift though, so I won't feel bad for the person who eventually receives it.
Next we have a wine stopper. It has a giant 'diamond' on the end. Again, we received 3 for our wedding. I really like them, but I don't need 3! When we first started getting wedding gifts, we put them in a box in our closet while we waited to get a house so we didn't even realize we had 3 of them until almost 2 years after we got them so we didn't return it. Again though, not a bad gift.
Another item we have in there is a mirror. It's one of those that swivels and fits on a desk or something. It's nice for putting on your make-up, especially since when you flip it over, it's magnified. The problem? I already have one. I got one from IKEA right before I left for college. Why can't I return it? Because I got it for free from Bed, Bath, & Beyond. It's a really nice thing they do for newlyweds! They have this 'party' where they invite multiple couples in the area about a month or so after your wedding and you get 20% off anything left on your registry (although they told us you can pretty much get anything, not just stuff on your registry). They'll even order things for you. They have cookies and drinks. They give you a free gift of your choice (something small-they have a couple things to choose from-we got a drying pad for dishes) and a mystery gift (this was our mystery gift). These things have a slash through the barcode so you can't return them.
I know you all love hearing my life story, so we'll move on to the next item. It's a blanket. My husband wanted this blanket on Amazon that has his favorite college football team on it for Christmas one year so my parents got it for him. Well, about a month later, they received another one. I guess there was some kind of mix-up. The sellers said to keep it if they wanted, but since they aren't fans of the team, they gave it to us. We have no use for 2 of the same blankets so it's in there. It's a very nice woven blanket.
If you are one of those people that thinks having a regifting bin in my house is in bad taste, I ask you, what should I do with these items? Donate them? Maybe. Sell them? That's worse in my opinion. And what about the people that receive these unwanted gifts? Well, in my personal opinion, they're lucky. Clearly, I like every single one of these items because I already own them. I would never give someone something that I wouldn't love to receive.
Thanks for reading! Do you have a place in your home where you keep items to regift? I'd love to hear about what you've received or given.
In our bin we have a glass mixing bowl from Pampered Chef. It's in there because I registered for one for our wedding and we received 3. As it turns out, I really enjoy having 2. I use them all the time. However, I really don't need 3. After I got them, I researched returning them and found that it was incredibly difficult. Bad Pampered Chef! That is not a good thing to be known for! Oh well. It's a really good gift though, so I won't feel bad for the person who eventually receives it.

Next we have a wine stopper. It has a giant 'diamond' on the end. Again, we received 3 for our wedding. I really like them, but I don't need 3! When we first started getting wedding gifts, we put them in a box in our closet while we waited to get a house so we didn't even realize we had 3 of them until almost 2 years after we got them so we didn't return it. Again though, not a bad gift.
Another item we have in there is a mirror. It's one of those that swivels and fits on a desk or something. It's nice for putting on your make-up, especially since when you flip it over, it's magnified. The problem? I already have one. I got one from IKEA right before I left for college. Why can't I return it? Because I got it for free from Bed, Bath, & Beyond. It's a really nice thing they do for newlyweds! They have this 'party' where they invite multiple couples in the area about a month or so after your wedding and you get 20% off anything left on your registry (although they told us you can pretty much get anything, not just stuff on your registry). They'll even order things for you. They have cookies and drinks. They give you a free gift of your choice (something small-they have a couple things to choose from-we got a drying pad for dishes) and a mystery gift (this was our mystery gift). These things have a slash through the barcode so you can't return them.
I know you all love hearing my life story, so we'll move on to the next item. It's a blanket. My husband wanted this blanket on Amazon that has his favorite college football team on it for Christmas one year so my parents got it for him. Well, about a month later, they received another one. I guess there was some kind of mix-up. The sellers said to keep it if they wanted, but since they aren't fans of the team, they gave it to us. We have no use for 2 of the same blankets so it's in there. It's a very nice woven blanket.
If you are one of those people that thinks having a regifting bin in my house is in bad taste, I ask you, what should I do with these items? Donate them? Maybe. Sell them? That's worse in my opinion. And what about the people that receive these unwanted gifts? Well, in my personal opinion, they're lucky. Clearly, I like every single one of these items because I already own them. I would never give someone something that I wouldn't love to receive.
Thanks for reading! Do you have a place in your home where you keep items to regift? I'd love to hear about what you've received or given.
Monday, March 10, 2014
My Favorite Toddler Boy Poses
Ah! I can't believe it. I missed my first day of the year. I didn't post yesterday. Well, I'll try to make up for it by posting twice today.
My son's birthday is coming up at the end of this month. That means it's time for photos. I was thinking about all the photos we've taken for the past couple years and my favorite poses. Clearly, I don't want all of his pictures through the years to look the exact same, but there are definitely a few tried and true poses that I love. Here are just a few.
(Sitting On Something):
.JPG)

(Leaning Against Something):


(Peaking Out Behind A Tree):

(Throwing Snow)-I like to keep him active so that he doesn't get restless:

(close-ups):

(Laying on the ground with a cool background):

Thinking back on what we've done in the past and looking at Pinterest (of course), I think I've come up with some pretty great ideas for my son's 4th birthday photoshoot. Any tips? or new posing ideas for me?
My son's birthday is coming up at the end of this month. That means it's time for photos. I was thinking about all the photos we've taken for the past couple years and my favorite poses. Clearly, I don't want all of his pictures through the years to look the exact same, but there are definitely a few tried and true poses that I love. Here are just a few.
(Sitting On Something):
.JPG)

(Leaning Against Something):


(Peaking Out Behind A Tree):

(Throwing Snow)-I like to keep him active so that he doesn't get restless:

(close-ups):

(Laying on the ground with a cool background):

Thinking back on what we've done in the past and looking at Pinterest (of course), I think I've come up with some pretty great ideas for my son's 4th birthday photoshoot. Any tips? or new posing ideas for me?
Saturday, March 8, 2014
Recipe: Butterfinger Pie
In a couple weeks, it will be March 14th. Do you know what that means? It's Pi Day! In case you don't understand, think about Pi. It is 3.1415926... and so on and so forth. Well, 3/14 is Pi Day every year so if you're going to make a pie, that is the day to do it. Last year, I made a Butterfinger Pie. It was pretty good. And to be honest, pretty good for you. Well, maybe not good for you, but it sure isn't bad for you. Give it a try.

Ingredients:
- 4 low fat graham cracker sheets
- 1 tub Fat Free Cool Whip, 8 oz
- 1 Butterfinger Candy Bar (2 oz), crushed
- 1/4 cup Hershey’s Light Chocolate Syrup
- 1/4 cup Smucker’s Sugar Free Caramel Topping
Directions:
Very lightly spray an 8 x8” glass dish or pan with butter flavored non-fat cooking spray. Line the bottom with the graham cracker sheets into the bottom. Mix together the whipped topping with half of the crushed Butterfinger. Spread the cool whip mixture over the graham crackers. Drizzle both the chocolate syrup and caramel syrup on top of the whipped topping. Sprinkle the remaining half of the Butterfinger on top. Freeze for at least 4 hours. Cut into 8 equally sized pieces.


Ingredients:
- 4 low fat graham cracker sheets
- 1 tub Fat Free Cool Whip, 8 oz
- 1 Butterfinger Candy Bar (2 oz), crushed
- 1/4 cup Hershey’s Light Chocolate Syrup
- 1/4 cup Smucker’s Sugar Free Caramel Topping
Directions:
Very lightly spray an 8 x8” glass dish or pan with butter flavored non-fat cooking spray. Line the bottom with the graham cracker sheets into the bottom. Mix together the whipped topping with half of the crushed Butterfinger. Spread the cool whip mixture over the graham crackers. Drizzle both the chocolate syrup and caramel syrup on top of the whipped topping. Sprinkle the remaining half of the Butterfinger on top. Freeze for at least 4 hours. Cut into 8 equally sized pieces.

Friday, March 7, 2014
St. Patrick's Day Cinnamon Rolls
We decided to make a green St. Patrick's Day themed breakfast! Ever since our little one has become big enough to actually understand what's going on around him, my husband and I have really gotten in the holiday spirit and I'm not just talking about Christmas. We get in the spirit for every holiday! Christmas, New Years, Superbowl, Valentine's Day, St. Patrick's Day, 4th of July, you name it, we love it! Plus, most of the things we do are fairly easy and inexpensive. Like these clover cinnamon rolls!

Ingredients:
-canned cinnamon rolls (8-ct)
-green food coloring
Steps:
1. Preheat your oven according to your canned cinnamon roll package. Ours said to preheat the oven to 400 degrees.
2. Grease a 9x13 pan.
3. Make 6 hearts by unrolling the cinnamon roll, fold in half, then roll the edges toward the middle. Place 3 hearts into ¾ of a circle and the other 3 hearts in the same way on the other side of the pan. With the 2 remaining cinnamon rolls, unroll them, fold them in half, and then put one in the open space between each set of 3 hearts.

4. Bake according to the packaging. We baked ours for 13 minutes.
5. While your waiting for your cinnamon rolls to finish baking, take your icing that came with the package and squeeze it into a small bowl or squueze bottle. Put a couple drops (I used 5) of green food coloring in and stir. To make this easier, I actually microwaved the icing for 10 seconds. It made it runnier.

6. When the cinnamon rolls are done, let them sit for a couple minutes to cool. Then spread or squeeze the icing on top and serve!
I think they turned out great! What are you doing for St. Patrick's Day?

Ingredients:
-canned cinnamon rolls (8-ct)
-green food coloring
Steps:
1. Preheat your oven according to your canned cinnamon roll package. Ours said to preheat the oven to 400 degrees.
2. Grease a 9x13 pan.
3. Make 6 hearts by unrolling the cinnamon roll, fold in half, then roll the edges toward the middle. Place 3 hearts into ¾ of a circle and the other 3 hearts in the same way on the other side of the pan. With the 2 remaining cinnamon rolls, unroll them, fold them in half, and then put one in the open space between each set of 3 hearts.

4. Bake according to the packaging. We baked ours for 13 minutes.
5. While your waiting for your cinnamon rolls to finish baking, take your icing that came with the package and squeeze it into a small bowl or squueze bottle. Put a couple drops (I used 5) of green food coloring in and stir. To make this easier, I actually microwaved the icing for 10 seconds. It made it runnier.

6. When the cinnamon rolls are done, let them sit for a couple minutes to cool. Then spread or squeeze the icing on top and serve!
I think they turned out great! What are you doing for St. Patrick's Day?
Thursday, March 6, 2014
Recipe: Nutella Cookies
I made these for my husband this past weekend. He LOVES Nutella. I've seen a couple recipes on Pinterest, but I wanted to try the simplest one I could find. And here it is!

Ingredients:
1 cup of Nutella
1 cup of flour
1 egg
Steps:
1. Preheat the oven to 350 degrees.
2. Mix all the ingredients together. Add water if the mixture is too crumbly.
3. Taste it. (I know, I know, it has a raw egg in it) If it tastes like it needs sugar, add some. I think it needs a little. Not a lot. Just a tablespoon or 2.
4. Roll into 1-inch balls and use a fork to press down (like peanut butter cookies).
5. Bake for 6-8 minutes.
I think they turned out great. And my husband really loves them. I hope you like them too!

Ingredients:
1 cup of Nutella
1 cup of flour
1 egg
Steps:
1. Preheat the oven to 350 degrees.
2. Mix all the ingredients together. Add water if the mixture is too crumbly.
3. Taste it. (I know, I know, it has a raw egg in it) If it tastes like it needs sugar, add some. I think it needs a little. Not a lot. Just a tablespoon or 2.
4. Roll into 1-inch balls and use a fork to press down (like peanut butter cookies).
5. Bake for 6-8 minutes.
I think they turned out great. And my husband really loves them. I hope you like them too!
Subscribe to:
Posts (Atom)